
Set up a lead form
A lead form asks for an email or phone number before the document opens, or partway through it. It’s available on every plan, Starter (free) included. Someone who would otherwise stay anonymous becomes a contact you can follow up with.
What is a lead form?
Section titled “What is a lead form?”A lead form is the panel a viewer fills in before reaching the document. It collects an email, a name, a phone number, or any field you define, and stores those answers next to that person’s reading data.
FeatPaper never sends the file itself. You share a link to the document, and the form only ever appears to people who arrive on that document’s lead capture link. The link works from the start: until you change the form, it shows the default one that asks for an email.
- There is one form per document. You cannot attach different forms to different links.
- The form appears before the viewer moves past the page where the marker sits, so a marker at the front shows the form the moment the document opens.
- Answers are stored as the same person as their reading record, which is how views and submissions line up.
Collect emails before someone views the file
Section titled “Collect emails before someone views the file”Build a lead form and share the lead capture link. Anyone opening that link has to complete the form before they can move past that point.
| Link | Does the form appear? |
|---|---|
| Lead capture link | Yes. Details first, then the document. |
| Open-access link | No. It opens straight away. |
| Per-recipient link | No. You already know who this is, so it never asks again. |
| Public web link | No. This is the public link you post on a site or blog, and no form can be attached. |
The lead form is available on every plan
Section titled “The lead form is available on every plan”You can build and use a lead form on every plan, Starter included. The old “Pro and above” restriction is gone.
| Capability | Plan needed |
|---|---|
| Build the form, arrange fields, share the lead capture link | Every plan |
| Auto-send document to viewer’s email | Every plan (it only needs a required email field) |
| Read the collected contacts on screen | Every plan |
| Export contacts to CSV (Download N in the Viewers toolbar) | Pro and above |
| Notion, Google Sheets, Zapier integrations (Notion, Sheets, Zapier in the Viewers toolbar) | Business and above |
| Form integration with an API key | Business and above |
The editor opens in two modes — lead form mode and motion mode
Section titled “The editor opens in two modes — lead form mode and motion mode”You build the lead form in the document editor, but that is not the same screen you use to lay videos and links over pages. The editor opens in one of two modes depending on how you got there. Arrive through a lead form button and the URL carries ?leadform=settings, which opens lead form mode: everything the form needs stays, and the motion controls disappear.
| On screen | Lead form mode | Motion mode |
|---|---|---|
Sidebar + Add Lead Form button (document with no form) | Shown | Hidden |
| Sidebar Lead Form marker (document with a form) | Shown | Hidden |
| The drop slots between pages that hold the marker | Shown | Hidden |
| Lead Form Settings panel | Opens from the marker or + Add Lead Form | Cannot be opened |
| Header motion type tabs VIDEO · GIF · EMBED · LINK · NAV · DOCS | Hidden | Shown |
| Header editing tip (lightbulb icon) | Hidden | Shown |
| First-run popup explaining motion | Never appears | Shown once |
| Sidebar page thumbnails | Shown | Shown |
FeatPaper logo · current and total page · SAVE & EXIT | Shown | Shown |
Two routes open lead form mode. Both land on the same screen.
| From | What you click |
|---|---|
| Document > Share links tab | Lead form settings › Open at the top of the Lead capture link row’s share settings sheet |
| Document > Viewers tab > Contacts | Lead form settings on the “No lead form configured yet” empty state |
Build the form
Section titled “Build the form”Open the editor in lead form mode
On the document’s Share links tab, open the share settings for the Lead capture link and click Open on the Lead form settings row at the top. The other route in the table above — the empty Contacts sub-tab — lands on the same screen.
Click + Add Lead Form
Above the page list on the left of the editor, click + Add Lead Form — the button exists in lead form mode only. A Lead Form marker is pinned to the front of the page list, and the settings panel opens on the right.
Choose what to collect
Write the intro line and add the fields you want. The center of the screen previews the form exactly as viewers will see it.
Position the marker
Drag the handle icon (⋮⋮) on the left of the marker to move it between pages. The form appears before the viewer moves to the page after the marker.
Save and exit
Click Save at the bottom of the panel, then SAVE & EXIT at the top right of the editor. Nothing takes effect until you click SAVE & EXIT. You will see “Lead form settings saved”, and the lead capture link starts showing your form.
What the form settings panel contains
Section titled “What the form settings panel contains”The panel opens with a line telling you to set up the form shown on the document. The center of the screen previews the form live as you edit.
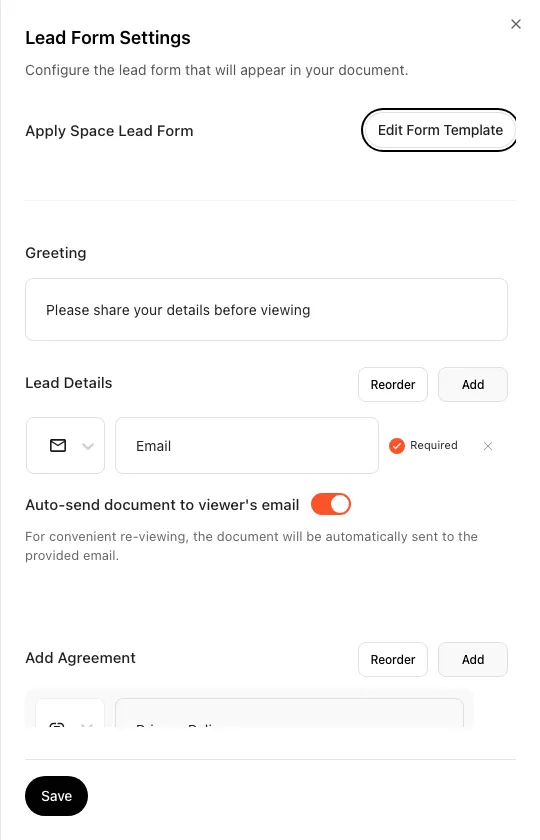
Apply Space Lead Form
Section titled “Apply Space Lead Form”Apply Space Lead Form at the top of the panel pulls a form saved on the space into the current document. If the space holds several templates, pick one from the template chips. The first chip, Primary, is the default. Applying a template copies its configuration once, so editing the space template later leaves documents you already applied it to untouched. Any teammate can apply a template.
Edit Form Template is available to space admins only. For everyone else the button is disabled, and clicking it explains that only space admins can edit templates.
Intro line
Section titled “Intro line”One line shown above the form. There is no separate description field.
Fields
Section titled “Fields”Add adds a field and Reorder turns on drag sorting. Pick each field’s type from the dropdown on its left.
| Field type | What it collects |
|---|---|
| Text | Free-form text such as a name or company. |
| An email address. | |
| Checkbox | Multiple selections. |
| Radio | A single selection; + adds an option and X removes one. |
Select Required on the right of a field to make it mandatory. The X icon deletes the field.
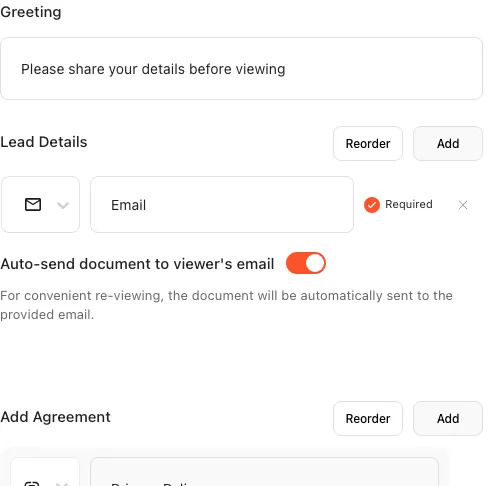
Auto-send document to viewer’s email
Section titled “Auto-send document to viewer’s email”Every plan can use this toggle, Starter included — if it’s greyed out, your form has no required email field. The only requirement is at least one email field marked Required, so check that box before looking at your plan. It isn’t the same thing as the email tool integration, which needs Pro or above. Marking an email field Required switches the toggle on for you.
With it on, the document is emailed to the address someone submits, which makes it easy for them to come back later. Without a required email field the toggle is disabled and explains that you need at least one required email field.
Agreements
Section titled “Agreements”Add creates an agreement item and Reorder sorts them. Pick a type on the left.
- Link takes a title plus an external URL, for example
https://featpaper.com/privacy. - Text takes a title plus the full text you type in.
The X icon removes an item.
Form language
Section titled “Form language”The form’s system wording is stamped with your dashboard language when you create the form or apply a space template. Editing the contents of an existing form and saving does not restamp it. Field labels and the intro line are free text you wrote and are never translated automatically.
To reach several language groups, write the labels and intro line in the language you need, or create a separate document and link per language.
Set the form position
Section titled “Set the form position”Once a form exists, a Lead Form marker sits in the page list on the left of the editor when it is open in lead form mode (motion mode hides it). Grab the handle icon (⋮⋮) on its left and drag it between pages; the tooltip reads “Drag to move”. Blue dashed slots mark where you can drop it while you drag.
Viewers get the form before they move to the page after the marker. Put it between pages 3 and 4 and the form appears as they leave page 3. Put it at the very front and the form appears the moment the document opens.
How the lead capture link relates to the other links
Section titled “How the lead capture link relates to the other links”The form appears only to people arriving on the lead capture link. The same document opened through any other link shows no form.
- Open-access link viewers open the document with no form.
- Per-recipient link viewers also open the document with no form, even while a form exists, because you already know who they are.
- Public web links cannot carry a form at all, since they are public links meant for AI search.
How one contact is counted — email, then phone number, then the first required value
Section titled “How one contact is counted — email, then phone number, then the first required value”One contact means one distinct person, not one submission. If the same person submits three times, that is still one contact.
How a person is identified depends on what your form collects.
With an email field, the email decides
Case and surrounding whitespace are ignored, so Kim@Corp.com and kim@corp.com are the same person.
With no email, the phone number decides
Only the digits are compared, so 010-1234-5678 and 01012345678 are the same person. A form that collects phone numbers and no email addresses is counted just as accurately.
With neither, the first required value decides
The value of the form’s first required field identifies the person.
Read and export the contacts you collected
Section titled “Read and export the contacts you collected”Submissions land on the Contacts sub-tab of the document’s Viewers tab. Contacts is the default sub-tab, so it is what you see when the tab opens. Each row carries the interest grade, one column per form field, views, referrer, stay time, and the submission time.
- Same viewer grouping, on by default, collapses one person’s submissions into a single row and shows their latest. Nothing is deleted; only the display is grouped. A different email or phone number is never merged, even on the same computer.
- The Interest badge reflects reading activity, not whether someone submitted a form. Submitting and barely reading can read as
Cold. - Tables draw 200 rows at a time, and Show 200 more below adds another 200. Search, sorting, counts, and CSV always use the full set.
- The toolbar search box finds people by name, email, or field value, and Expand widens the table to full screen.
- You connect Notion or Google Sheets and download CSV from the Viewers tab toolbar. Zapier is set up on the Zapier side: build a Zap with the FeatPaper app and pick this document. The Zapier button in the toolbar only shows what is connected. See document analytics.
Form integration — keep the form you already use
Section titled “Form integration — keep the form you already use”Form integration is not the Google Sheets, Notion, or Zapier integration. It brings details from your own site form or Typeform into FeatPaper. Sending collected contacts out to Sheets, Notion, or Zapier is set up from the Notion · Sheets · Zapier buttons in the Viewers tab toolbar.
Form integration needs Business or above. You’ll find it at the bottom of the link list on the document’s Share links tab: Integrations section › Form integration row. Click Generate key in the dialog to get this document’s API key (one key per document). The row’s Connect button opens the same dialog. On Starter and Pro the dialog still opens, but the API key area shows “Form integration is available on Business and above.” with an Upgrade plan button instead.
If you already collect details through your own site form, Typeform, or Tally, keep that form and let FeatPaper collect the reading analytics. Zapier or Make can do the wiring without code.
A viewer fills in your form
Your site form, Typeform, Tally: anything works. Ask for an email, since that is how FeatPaper identifies the person.
On submit, send it to FeatPaper
In Connect, use Generate key to issue an API key for this document, then post the email and fields to FeatPaper with that key on submit. Zapier or Make does this without code, and you can include up to 10 extra fields.
Send the viewer to the link you get back
FeatPaper returns a viewing link. It opens without the lead form, and the details plus the reading record land in your analytics.
API keys are issued per document, not per space. Regenerating or revoking one document’s key leaves external forms wired to other documents untouched.
- The key is shown in full exactly once: “Copy this key now — it’s shown only once.” After that you see a few leading characters and the creation date. If you miss it there is no way to see it again, so you have to issue a new one.
Regenerateswaps in a new key and invalidates the old one immediately. Any server still holding the old key stops working until you update it.Revokeblocks the very next request, with no grace period, and cannot be undone.- The row badge reads Connected or Not connected.
What the viewer sees
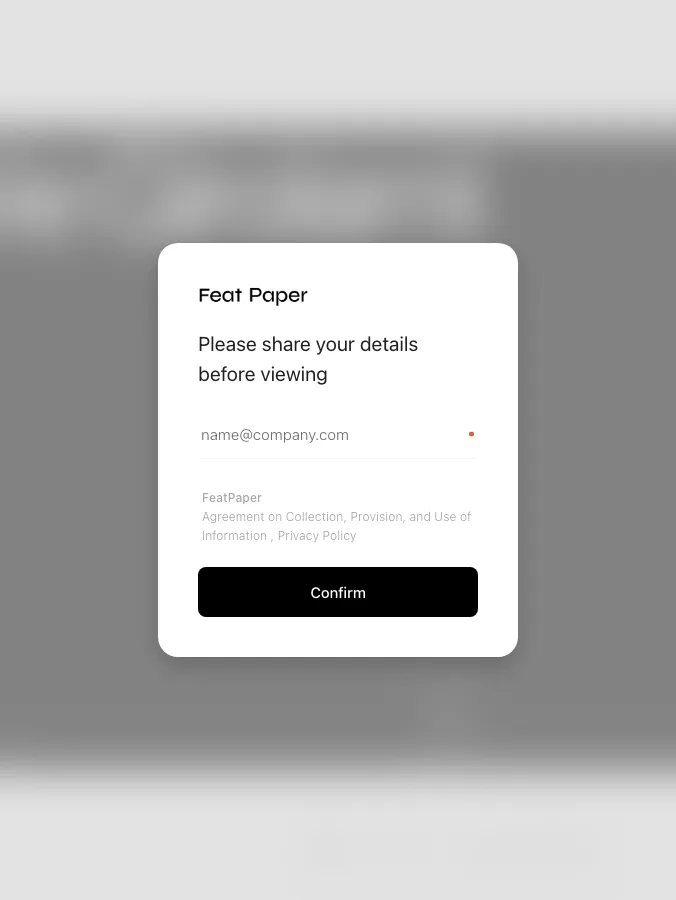
Section titled “What the viewer sees”Someone opening the document on the lead capture link gets the form where the marker sits, and has to fill it in to continue past that point.
Ways to use this
Section titled “Ways to use this”A lead form does not stop at collecting an address. It carries into follow-up once you pair it with reading data, auto-send, and an integration. Three combinations people reach for most.
Collect leads in a form tool and email the file as an attachment, and “who asked for it” and “who actually read it” end up in two places that never meet. A lead form stores the submission and the reading record as the same person, so a single row tells you how far that contact got.
Button and shortcut reference
Section titled “Button and shortcut reference”| Control | Where | What it does |
|---|---|---|
| Lead form settings › Open | Top of the lead capture link’s share settings sheet | Opens the editor in lead form mode (?leadform=settings) — save the sheet first. |
| Lead form settings | ”No lead form configured yet” empty state on Viewers tab > Contacts | Opens the same lead form mode. |
+ Add Lead Form | Above the page list in the editor (lead form mode only) | Pins the marker to the front and opens the settings panel. |
| Marker handle (⋮⋮) | Page list in the editor (lead form mode only) | Drags the marker to another position in the page list. |
| Marker label to pencil icon | Page list in the editor (lead form mode only) | Reopens the settings panel from anywhere in this area. |
| Apply Space Lead Form | Top of the settings panel | Copies a space template into this document once. |
| Edit Form Template | Top of the settings panel | Manages the space templates themselves, space admins only. |
| Add / Reorder | Fields and agreements | Adds an item or turns on drag sorting. |
| Required checkbox | Right of each field | Makes that field mandatory. |
| Auto-send document to viewer’s email | Below the fields | Emails the document to whoever submits, and needs a required email field. |
| Save | Bottom of the settings panel | Saves the panel’s configuration. |
SAVE & EXIT | Top right of the editor | Commits everything, including the form, and leaves the editor. |
| Connect | Share links tab, Integrations, Form integration | Opens the external form dialog, Business and above. |
| Generate key / Regenerate / Revoke | External form dialog | Issues, replaces, or kills this document’s API key. |
| Reissue link | Lead capture link row | Issues a fresh link; the old address stops working. |
| Contacts sub-tab | Document, Viewers tab | Shows only people who submitted the form, the default sub-tab. |
Shortcut: Open My Documents
Frequently asked questions
Section titled “Frequently asked questions”How do I collect emails before someone views the file?
Build a lead form and share the document’s lead capture link. Anyone opening that link has to complete the form before the document appears. Create the form in the editor with + Add Lead Form and save it with SAVE & EXIT. Until you change the form, the link shows the default form that asks for an email. People arriving on a open-access link or a per-recipient link never see the form.
My lead form tab is missing. Where do I set this up now?
The standalone tab is gone. You turn the form on and edit it from the Lead capture link on the document’s Share links tab, and you read submissions on the Contacts sub-tab of the Viewers tab.
I opened the lead form settings and the video and GIF tabs are gone.
That is expected. The editor splits into lead form mode and motion mode depending on how you entered. A lead form button opens it with ?leadform=settings in the URL, which is lead form mode, and that hides the header’s VIDEO · GIF · EMBED · LINK · NAV · DOCS tabs along with the editing tip lightbulb. To add a video or a link, leave with SAVE & EXIT and come back through Add video or link on the document’s Content tab. Add motion effects covers that side.
I opened the editor through Add video or link and the lead form marker is missing.
You are in motion mode. That mode hides the + Add Lead Form button, the Lead Form marker, and the drop slots between pages, leaving page thumbnails only. Nothing was deleted, and saving with SAVE & EXIT from motion mode keeps the form and its position exactly as they were. To see the marker again, go to the Share links tab, open the Lead capture link row’s share settings, and click Lead form settings › Open.
What is the lead capture link, and how is it different from the open-access link?
Every document has a working lead capture link, and only people arriving on it see the form. Open-access link viewers open the document straight away. Until you change the form, the link shows the default form asking for an email; edit and save the form to change what it collects.
Which plan do I need for a lead form?
Every plan, Starter included. The old “Pro and above” restriction is gone. What is gated: form integration needs Business or above, CSV export needs Pro or above, and Notion, Google Sheets, and Zapier integrations need Business or above.
Can I collect phone numbers instead of email addresses?
Yes, and the count stays accurate. Identity resolves in order: email, then phone number, then the first required value. With no email field the phone number identifies the person, and only the digits are compared, so 010-1234-5678 and 01012345678 are the same person.
The same person submitted several times. Does that count as several contacts?
No. One contact is one distinct person, not one submission. The same email, ignoring case and whitespace, or the same phone number, digits only, is one contact however many times they submit. Placeholder values like unknown and anonymous are not counted as people.
Can I delete the form I added?
There is currently no button on screen for deleting a form. The marker in the editor offers only the handle (move) and the pencil (open settings). To share without asking for details, use a open-access link or a per-recipient link instead, since neither shows the form. To change only what you collect, delete the fields in the settings panel and save.
How do I share without the form?
Use the open-access link, which opens with no form. To send to one named person and still see whether they opened it, use a per-recipient link. Per-recipient viewers get no form even while a form exists on the document.
I saved the form but the web viewer doesn't show it.
Save in the panel is not enough. You also need SAVE & EXIT at the top right of the editor. When it goes through you will see “Lead form settings saved”.
I changed the share settings, clicked Open, and lost the change.
Open does not save the sheet; it navigates to the editor. Save the share settings sheet first, then click Open.
I can't drag the marker.
Only the handle icon (⋮⋮) on the left is the drag area. Clicking the label or the pencil opens the settings panel. They were split apart because the whole card used to be draggable, so clicking the label never opened the settings.
The settings panel is pre-filled the first time. Can I just save it?
Check it first. If the space has templates, the first (Primary) template loads automatically. With no template you get a built-in form with a required email field and auto-send on. Saving as-is sends exactly that to viewers.
The auto-send toggle is greyed out. Do I need a paid plan?
No. Auto-send document to viewer’s email works on every plan, Starter included. The only condition is at least one email field marked Required. Add an email field in the panel, or tick Required on the one you have, and the toggle unlocks and switches on. Remember to finish with SAVE & EXIT in the top-right corner of the editor, or nothing is saved.
Can the document be emailed to whoever submits the form?
Yes, on any plan. With at least one email field marked Required, you can turn on Auto-send document to viewer’s email. One catch: if you later untick Required on that field or delete it, the toggle is silently switched off and saved that way. Re-check it after reorganizing fields.
Where do I read the contacts, and how do I export them?
Read them on the Contacts sub-tab of the Viewers tab, which is the default sub-tab. Notion, Google Sheets, and Zapier delivery and CSV download both live in that tab’s toolbar. CSV (Download N) needs Pro or above and the integrations need Business or above. The one CSV that needs Business is the per-recipient link list from Create in bulk from an email list, which is a different feature from the contacts export. See document analytics.
Can I keep using my own site form or Typeform?
Yes. In the Share links tab’s Integrations › Connect, issue an API key for this document and post the email and fields with that key when your form is submitted. FeatPaper returns a viewing link that opens without the lead form, and the reading data is still recorded. Zapier or Make handles the wiring without code. Requires Business or above.
Where do I get an API key?
Open the document’s Share links tab and scroll past the link list to the Integrations section below the divider. Click the Form integration row — the Connect button on its right does the same — and the dialog opens. Issue the key with Generate key in the API key area. It needs Business or above, and the key is per document, not an account-level setting. It is shown only once, so copy it right away.
Is the external form API key per document? When does regenerating or revoking take effect?
Keys are issued per document. Changing or revoking one leaves other documents’ external forms alone. Regenerate invalidates the old key immediately, and Revoke blocks the next request with no grace period. Neither can be undone, so you would need a new key. The key itself is shown in full only once, right after it is issued.
Does someone who already submitted have to fill it in again?
It depends. Refreshing the same tab or reading on does not re-ask. Coming back through the saved-mail link (?lf=) in the auto-send email opens the document directly. Without that link, closing the browser entirely, using a private window, or switching device or browser means filling it in again.
If I edit or delete a field, do I lose the values already collected?
No. Collected values stay in the contact list and the CSV. The list merges columns from the current form and from every field that ever appeared in a submission.
What happens if two fields share a label?
They collapse into one column. Text, checkbox, and radio fields are keyed by label, so two fields called “Department” show only the first matching value and hide the rest. The stored data is intact, but it looks lost on screen, so give each field a distinct label.
Checkbox answers show as Yes/No in English.
That is intentional. Checkbox values are normalized to Yes or No in the table, the CSV, and the integrations, in English regardless of dashboard language.
Is a form written in one language translated for viewers?
No. Field labels and the intro line are free text you wrote, so they are not translated to a viewer’s language. To reach several languages, write the labels in the language you need, or create a separate document and link per language.
If I edit a space template, do documents that already use it change?
No. Applying a template copies its configuration once, so later edits to the template leave existing documents alone. A space can hold several custom forms to pick from, and editing the template itself, via Edit Form Template, is limited to space admins.
What happens to the custom forms I built in dashboard 1.0?
They are copied to the space during the automatic move to 2.0. After the move you can still pick them from the template chips under Apply Space Lead Form and apply them to a document.
Someone gave me their email but shows as Cold. Is that right?
Yes. The interest grade comes from reading activity, not from submitting a form. Submitting and then barely reading, with no return visit, reads as Cold.
Key points
Section titled “Key points”- Lead forms work on every plan. The lead capture link is always available, and without a custom form it asks for an email.
- Build the form in the editor’s lead form mode (Share links tab > lead capture link > Lead form settings ›
Open) with+ Add Lead Form. The motion mode you reach through Add video or link on the Content tab shows no form marker. - Move the marker by dragging the handle (⋮⋮), and commit both the contents and the position with
SAVE & EXIT. - One contact is one person. Identity resolves email, then phone number, then the first required value, so phone-only forms count accurately.
- Only the lead capture link shows the form. Open-access links, per-recipient links, and Public web links open straight through.
- Form integration needs Business or above, uses a per-document API key, and shows the key in full only once.
- There is currently no button for deleting a form. To collect nothing, share through a different link.
Learn more
Section titled “Learn more”See who read your document
Read your contacts next to interest grades and referrers, then export or sync them.
Share with a link
How the lead capture link differs from the others, and what each link’s settings do.
Connections
Manage Slack view notifications and your Notion account connection.
Add motion effects
The same editor in motion mode — how to add videos and links, and how the two modes differ.